ANDROID LOCALIZATION TUTORIAL
Lecture One: Basics
What is Localization?
Localization is the process of rendering the content of your app into other languages and customizing your app for each target market that you want to support.
It is a crucial step if you wish to acquire users from the 146+ countries that Google’s Play Store runs in. Users in other countries want to use your app in a language they understand and see dates, times, and numbers in familiar, regional formats.
In this tutorial we will walk through the basic steps for Android localization with Android Studio.
I18N
Before you can localize your app, you must internationalize it. Internationalization (I18N) is the process of enabling your app to adapt to different languages, regions, and cultures. In our academy, we will focus on adapting the text, or strings, in your app for multilanguage support.
Tip: Even if you do not plan to l10n your app, do not hardcode any of your text. Declare them as resources in a default strings.xml file and they can be extracted and reused, and for our purpose, easy translation.
Getting Started
Let’s internationalize your Android app now!
1) Download our sample Android project or create a new Android Studio Basic project with the name Android Localization Guide.
2) Open strings.xml in /res/values/strings.xml. This will be the default strings resources file where you will externalize and declare all of your text (Java and UI).
3) Your app’s name, Android Localization Guide, should already exist as a string resource.
<resources>
  <string name=”app_name”>Android Localization Guide</string>
</resources>
4) In your Design tab of content_main.xml, add a Plain TextView with the following text: This is my first Android localization project!

5) This string is currently hard-coded in your app. Externalize this into your strings.xmlby clicking on the textview element, pressing Alt + Enter, and selecting the option: [I18N]: Hardcoded string “This is my first Android localization project!”, should use @string resource.

6) An “Extract Resource” window will appear. Check values and click OK.

7) This textview resource should appear in strings.xml.
<string name="this_is_my_first_android_localization_project">This is my first Android localization project!</string>
8) After you’ve externalized your string resources, you can now access them in your app:
- Java: resource IDs generated in your project’s R class
R.string.this_is_my_first_android_localization_project - UI: referencing through attributes
android:text="@string/this_is_my_first_android_localization_project”More on this later…
Localize
Now that our project is ready for localization, let’s start localizing by adding a new language.
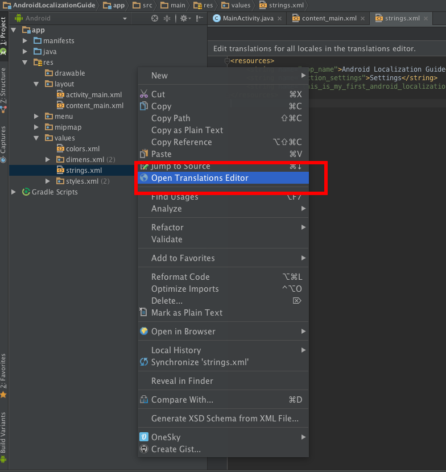
1) Right-click on the default strings.xml in the project panel > Open Translations Editor
2) On Translators Editor tab, click on the upper left blue globe icon to add French (fr).

3) This will create a French (fr) column. Translate this_is_my_first_android_localization_project directly in the French (fr) column with Ceci est mon premier projet de localisation Android!

4) A new strings.xml for your French translations will be automatically created in the directory /res/values-fr/strings.xml. Open up file fr/strings.xml to see your French translation!

Test
Time to see your localization efforts in action.
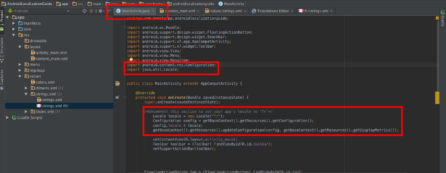
1) To quickly test your French translation, import the following libraries into your MainActivity.java:
import android.content.res.Configuration;
import java.util.Locale;
2) Add (or uncomment) the following code in your onCreate() function:
Locale locale = new Locale("fr");
Configuration config = getBaseContext().getResources().getConfiguration();
config.locale = locale;
getBaseContext().getResources().updateConfiguration(config, getBaseContext().getResources().getDisplayMetrics());
3) Run your emulator and see your French translation!

Download sample file for Android Localization Lectures!
Android Localization Guide-sample file
Go to Lecture Two: Format Strings and Plurals >
Go to Lecture Three: Best Practices >
About OneSky
OneSky provides seamless end-to-end localization solutions for thousands of mobile apps, games, websites, and businesses worldwide. We offer professional translation services in 50+ languages and a translation management system (TMS) with API integrations and plugins to streamline your workflow. We hire and carefully screen our own translators to ensure the highest control over quality. Using OneSky’s powerful QA features, cross-functional teams collaborate efficiently to deliver faster release cycles and higher quality translations. See how you can go global at www.oneskyapp.com


 Written by
