Android App Localization: A Beginner’s Guide
Did you know that Android has 72.83% of the global mobile operating system market share, and Google Play Store is available in over 146 countries?
If you want to enter the global market, you must make your app relevant and appealing to Android users. But what does the localization process entail, and how to localize your app for Android phones?
We have put together step-by-step instructions with android localization best practices to show you the nuts and bolts of successful android localization.
What is Android Localization?
Localization (l10n) turns the content on an app or website into other languages. Besides translation, you must address cultural references, slang, etc., to ensure that the content resonates with the local audience while presenting a consistent brand image across markets.
Android localization also involves adjusting various elements, such as the date, time, numbers, and currency formatting, to avoid misunderstanding and frustration. You may need to update audio files, add captions to videos, and adjust graphics to make them appropriate for each local market.
But First, Internationalization (i18n)
Before localizing an app, you must internationalize it. Internationalization removes language dependencies (e.g., ensure that text is not hardcoded) so you can adapt the app to different languages, regions, and cultures.
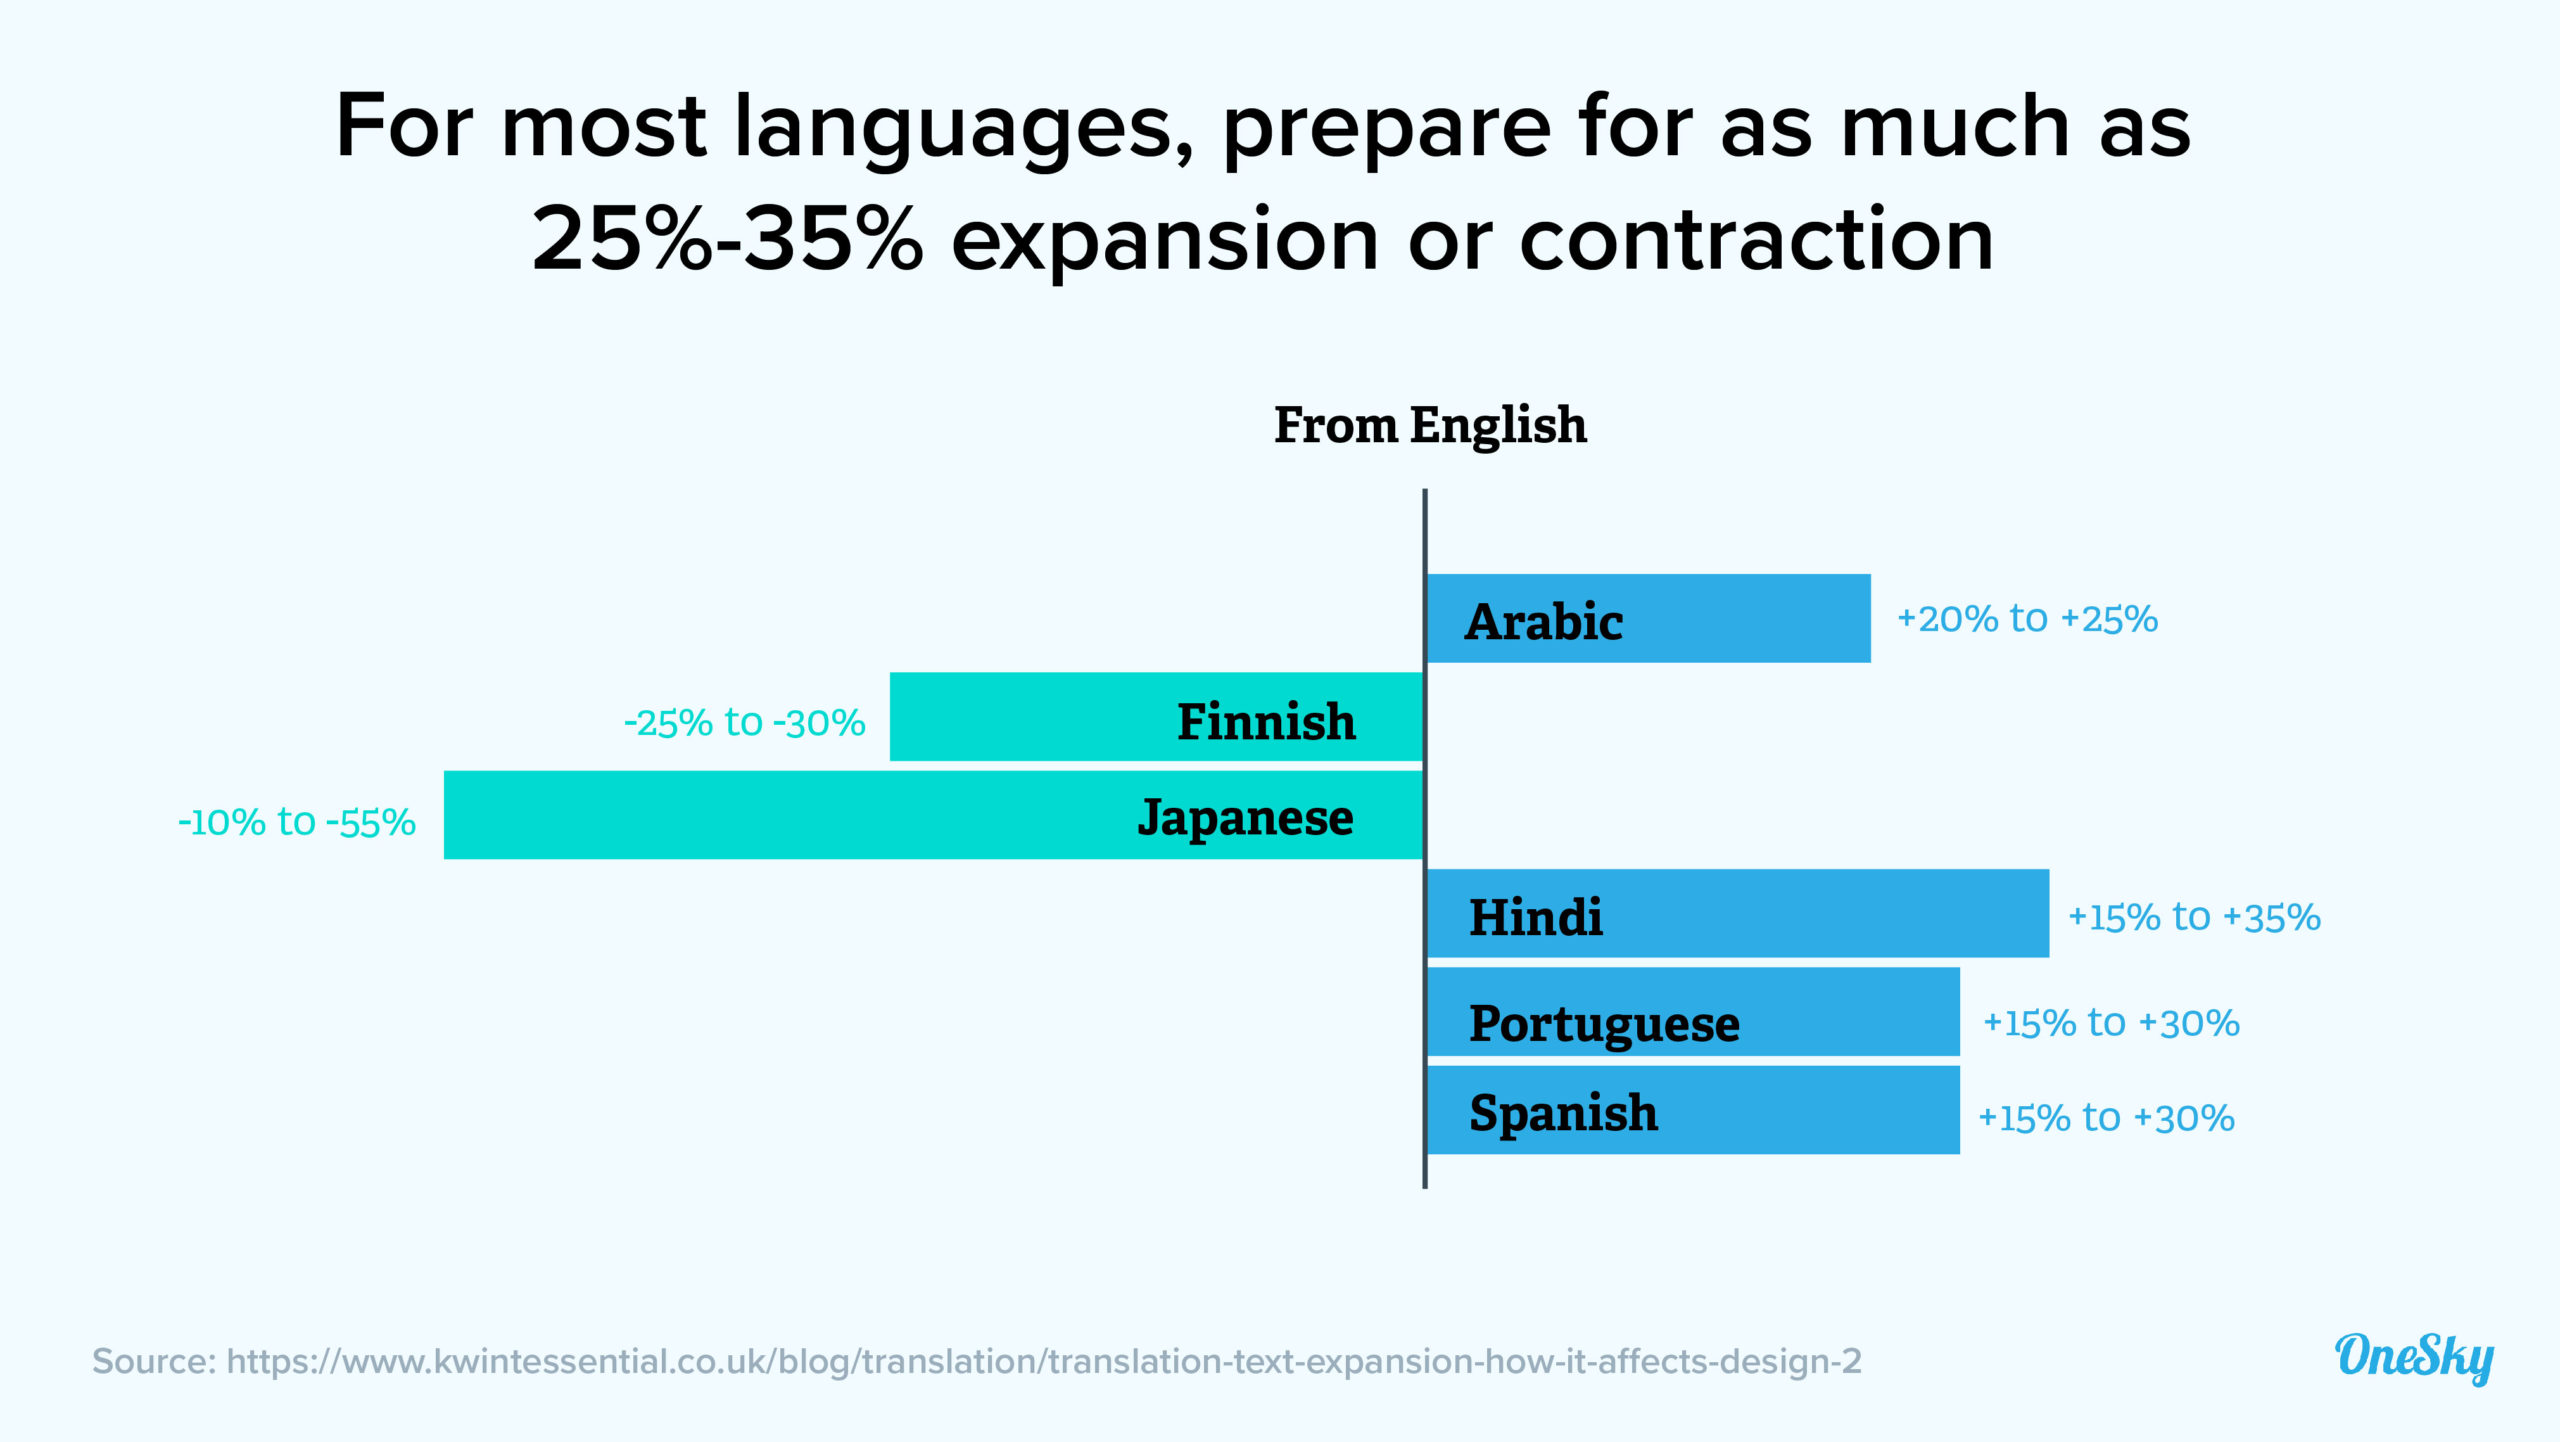
The process identifies and separates elements in an app that require localization. The usual suspects include text strings, images, audio files, plus date, time, number, and currency formats. It also considers how varying text lengths may affect the layout and how changing text direction may impact the user experience.
Here’s the good news: Android comes with built-in internationalization features, so you don’t have to start from scratch. When you create a new project using Google’s Android SDK tool, it will automatically generate files needed for app localization (more on that soon.)
How To Localize an Android App
You can localize your Android App using Android Studio. Here are the key steps to follow in your Android localization project:
1. Create a New Android Project
Set up your project and internationalize the content to get it ready for localization:
- Download our sample Android project or create a new Android Studio basic project with the name Android Localization Guide.
- You’ll find a /res/ directory at the top level of the project, which contains the default file.
- Open strings.xml in /res/values/strings.xml, which will be the default strings resources file for externalizing and declaring all of your text (i.e., Java and UI.) The app’s name, Android Localization Guide, should already exist as a string resource.
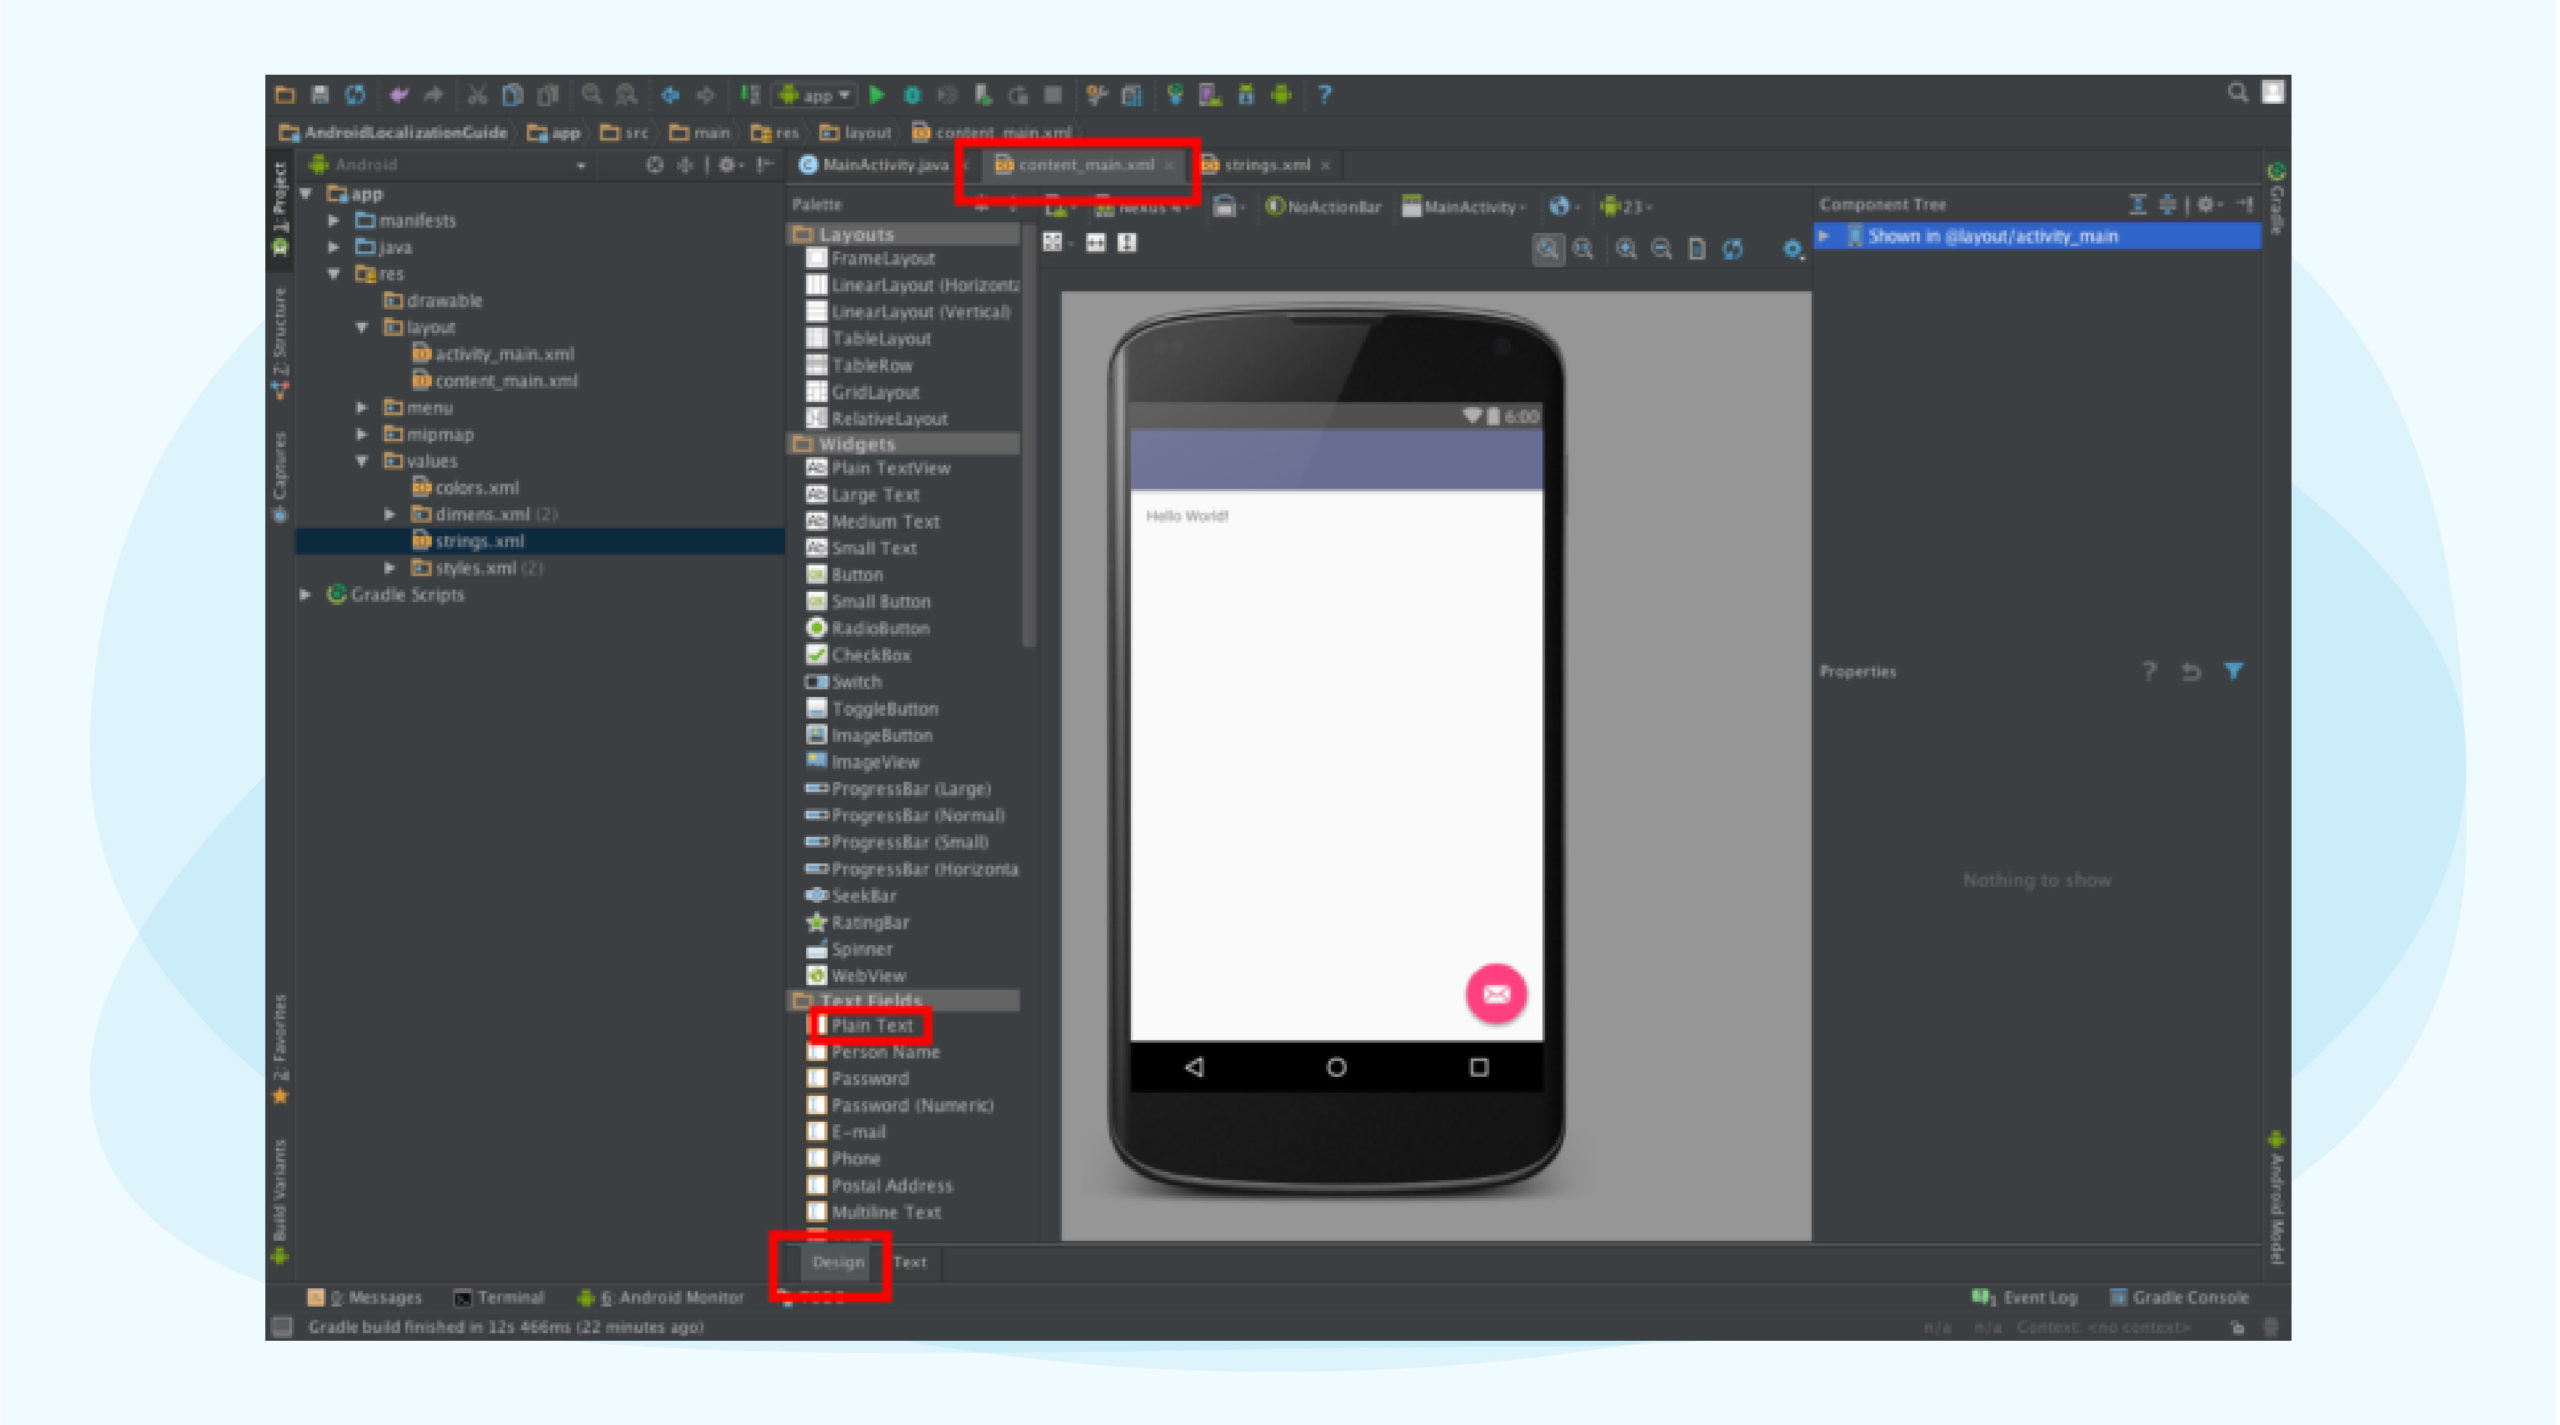
- In the Design tab of content_main.xml, add a Plain Text View sample text (e.g., “This is my first Android localization project!”)
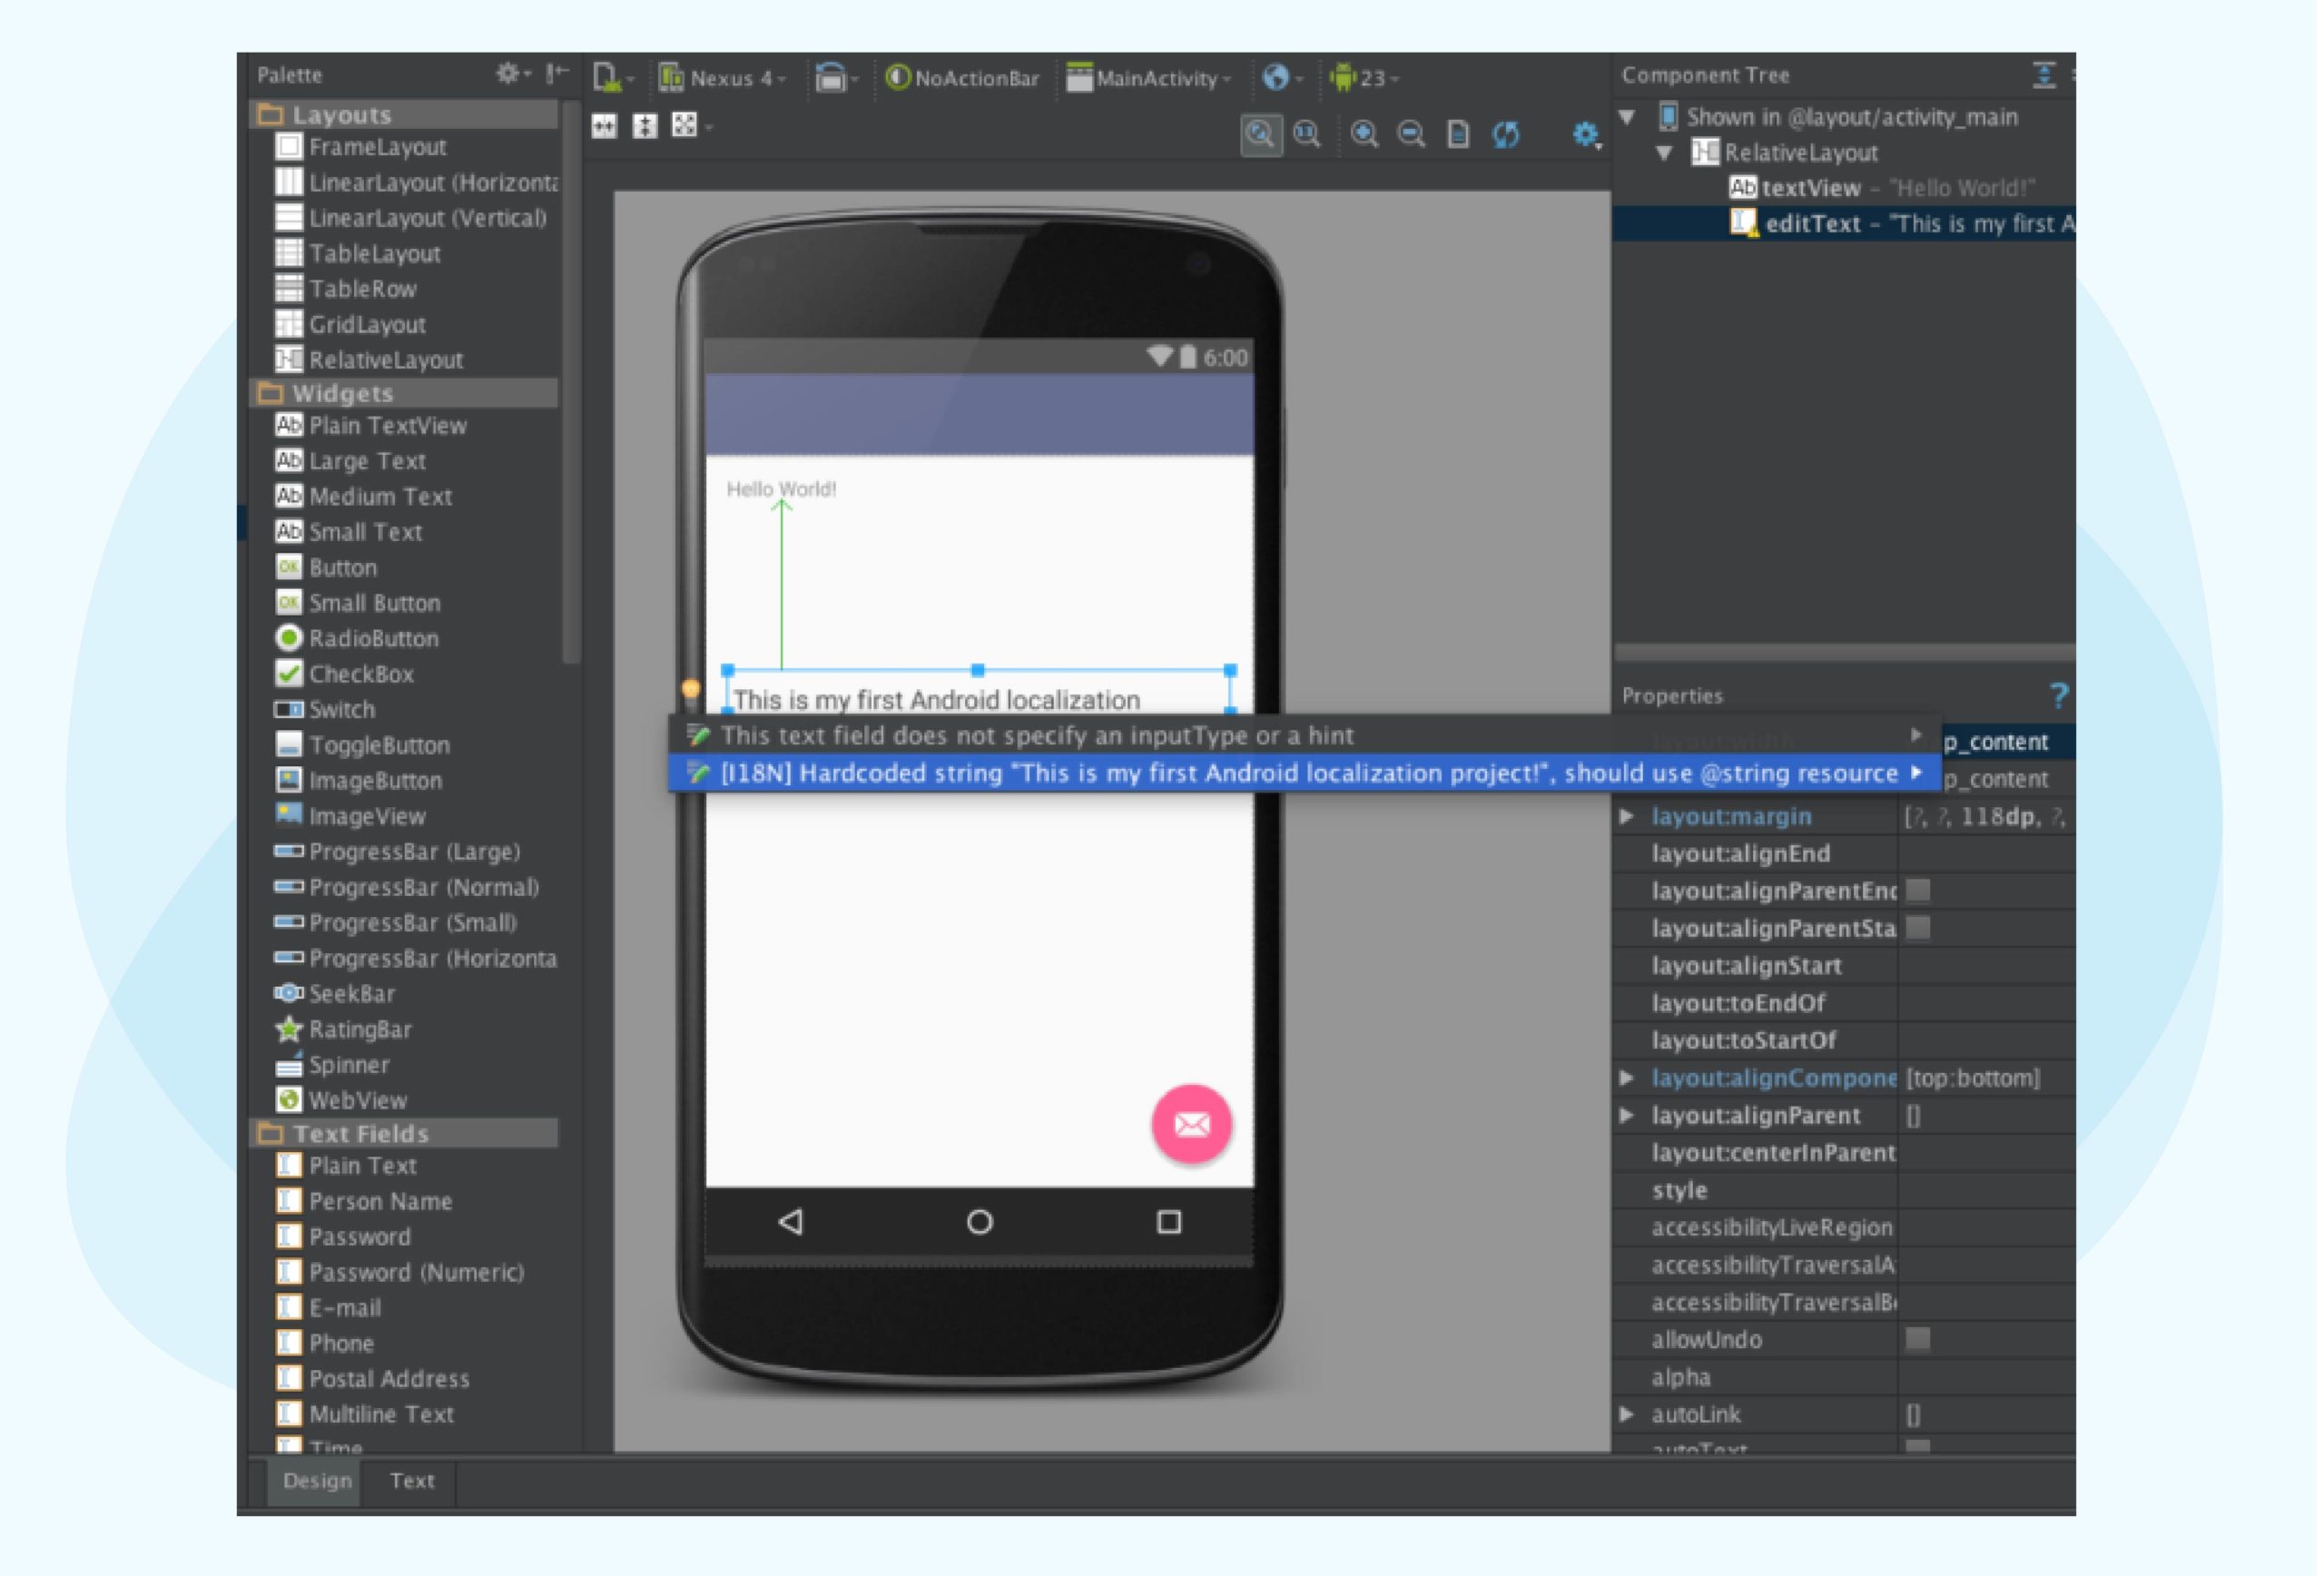
- This text string is currently hard-coded in the app, so we have to take it through the i18n process. Externalize it into a strings.xml file by clicking on the textview element, pressing Alt + Enter, and selecting the option: [I18N]: Hardcoded string “This is my first Android localization project!”, should use @string resource.
- An “Extract Resource” window will appear. Check the box for “values” and click OK. The textview resource will appear in strings.xml.
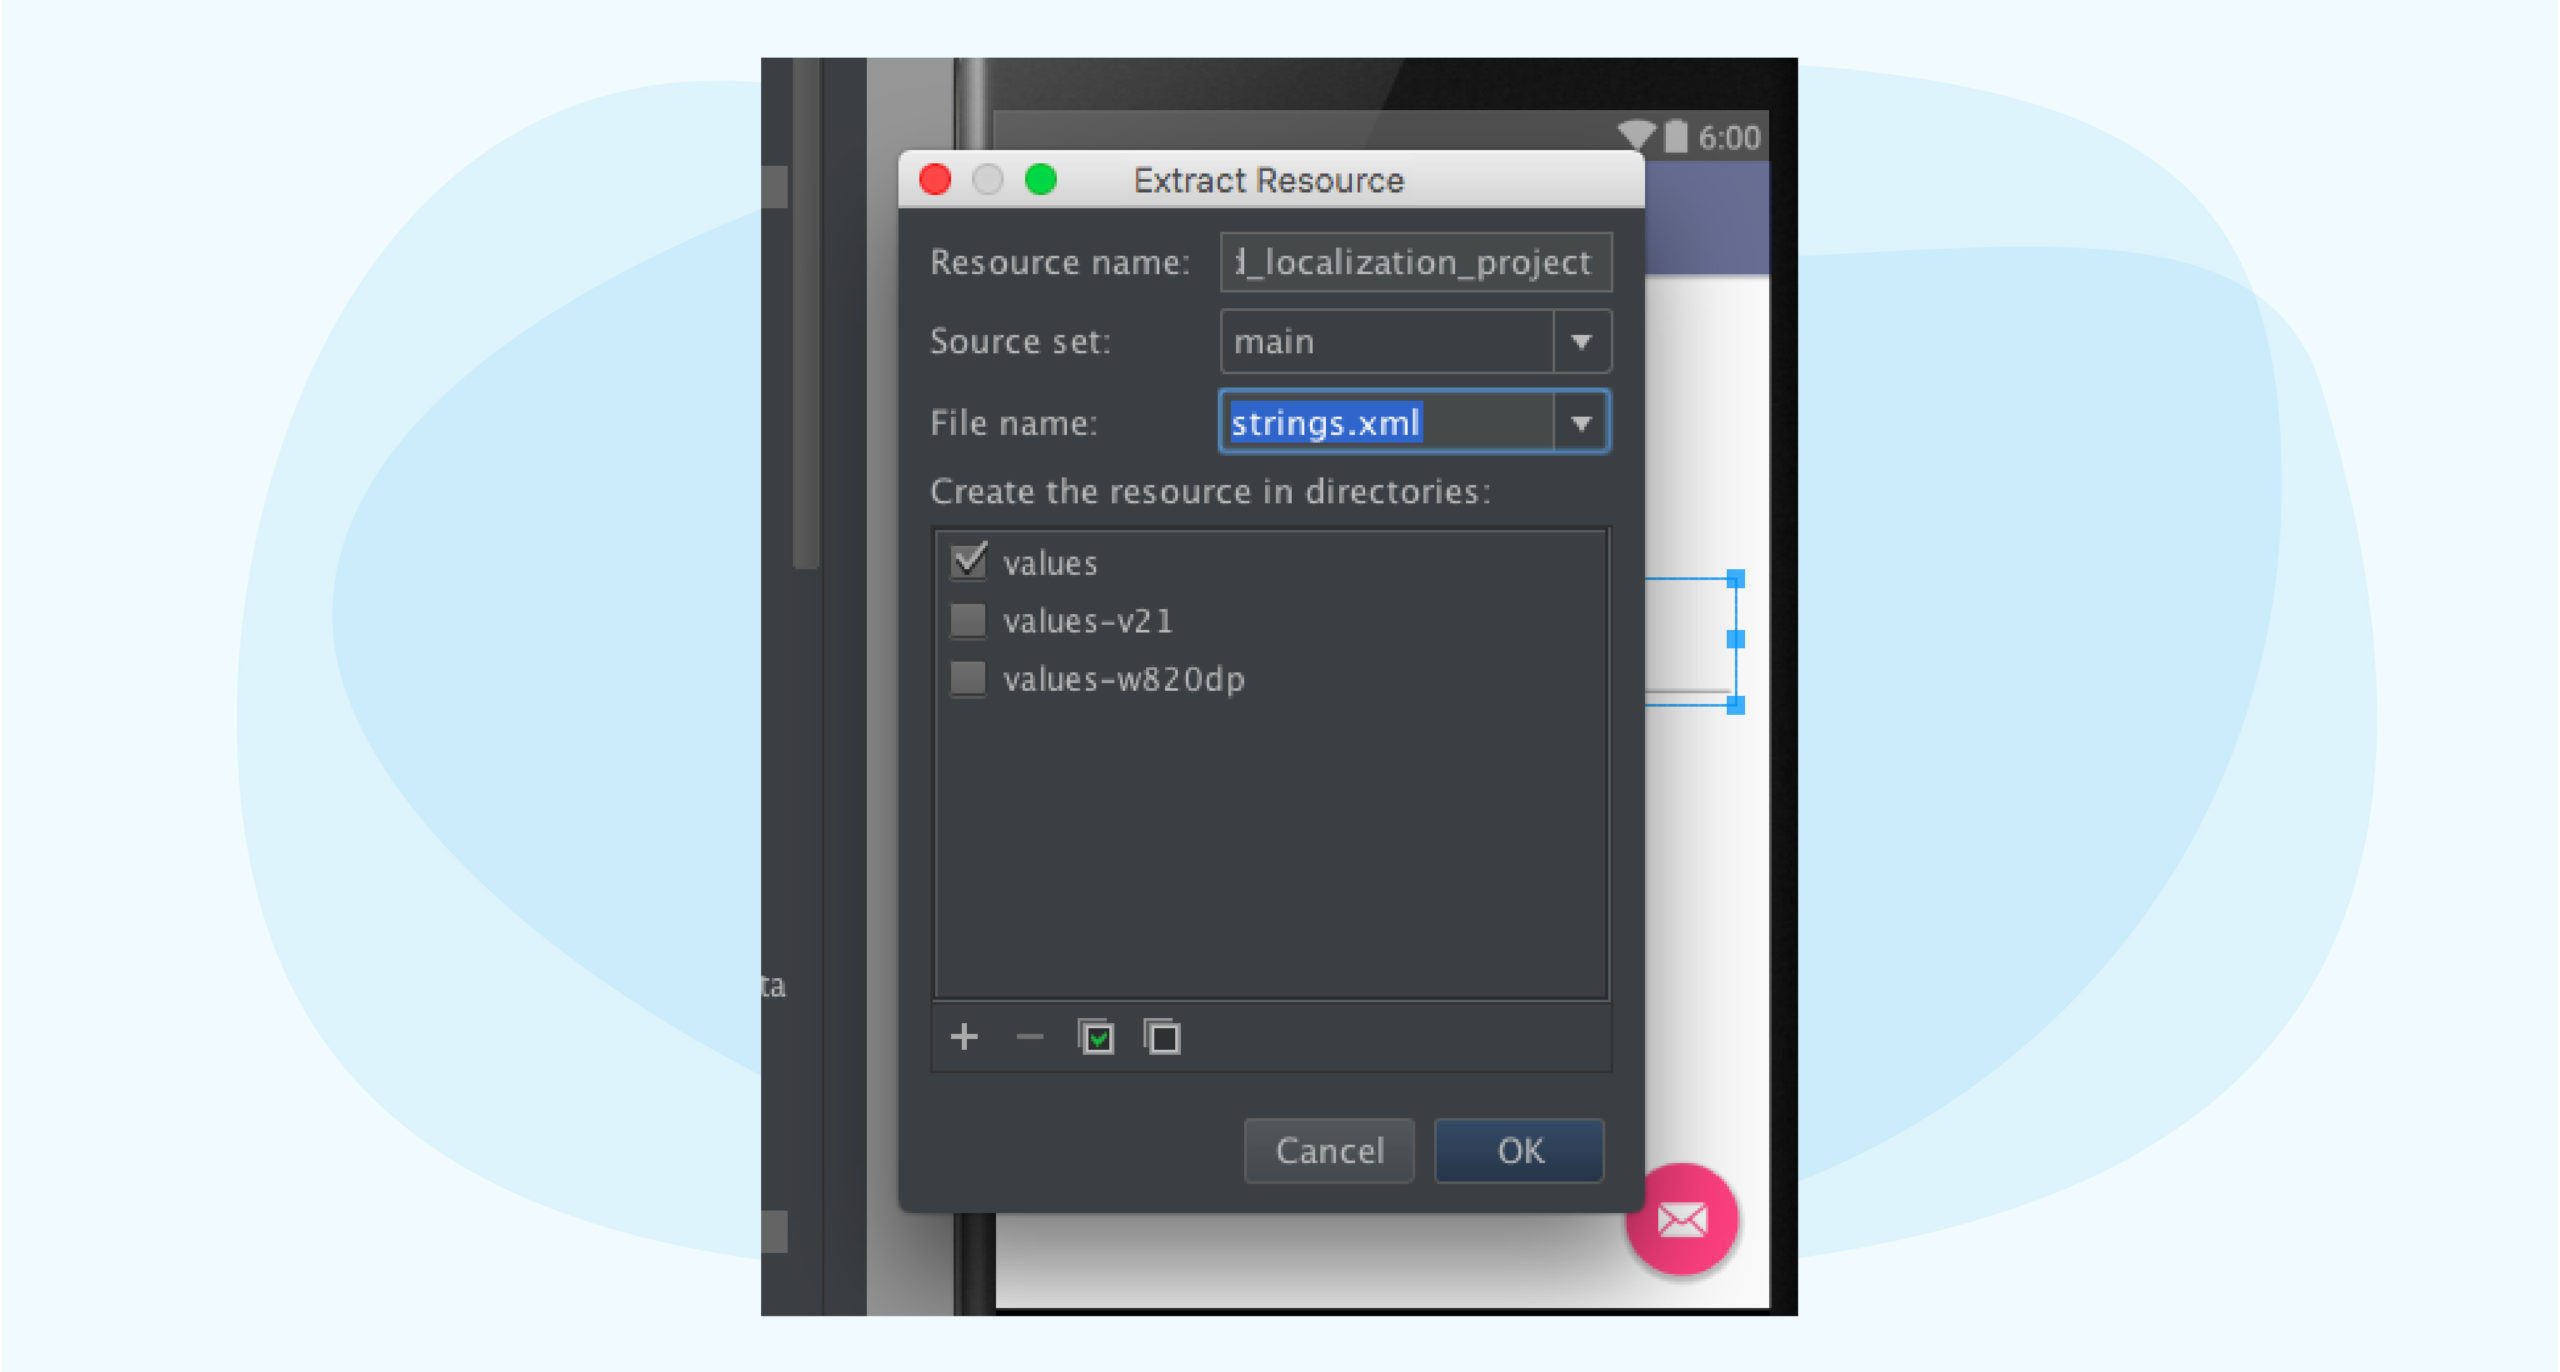
- After externalizing the string resources, you can access them in your app:
- Java: resource IDs generated in your project’s R class would look like R.string.this_is_my_first_android_localization_project
- UI: referencing through attributes is presented as android:text=”@string/this_is_my_first_android_localization_project”
2. Localize Your Content
The localization process starts with adding a new language. Here’s how:
- Right-click on the default strings.xml in the project panel and select Open Translations Editor
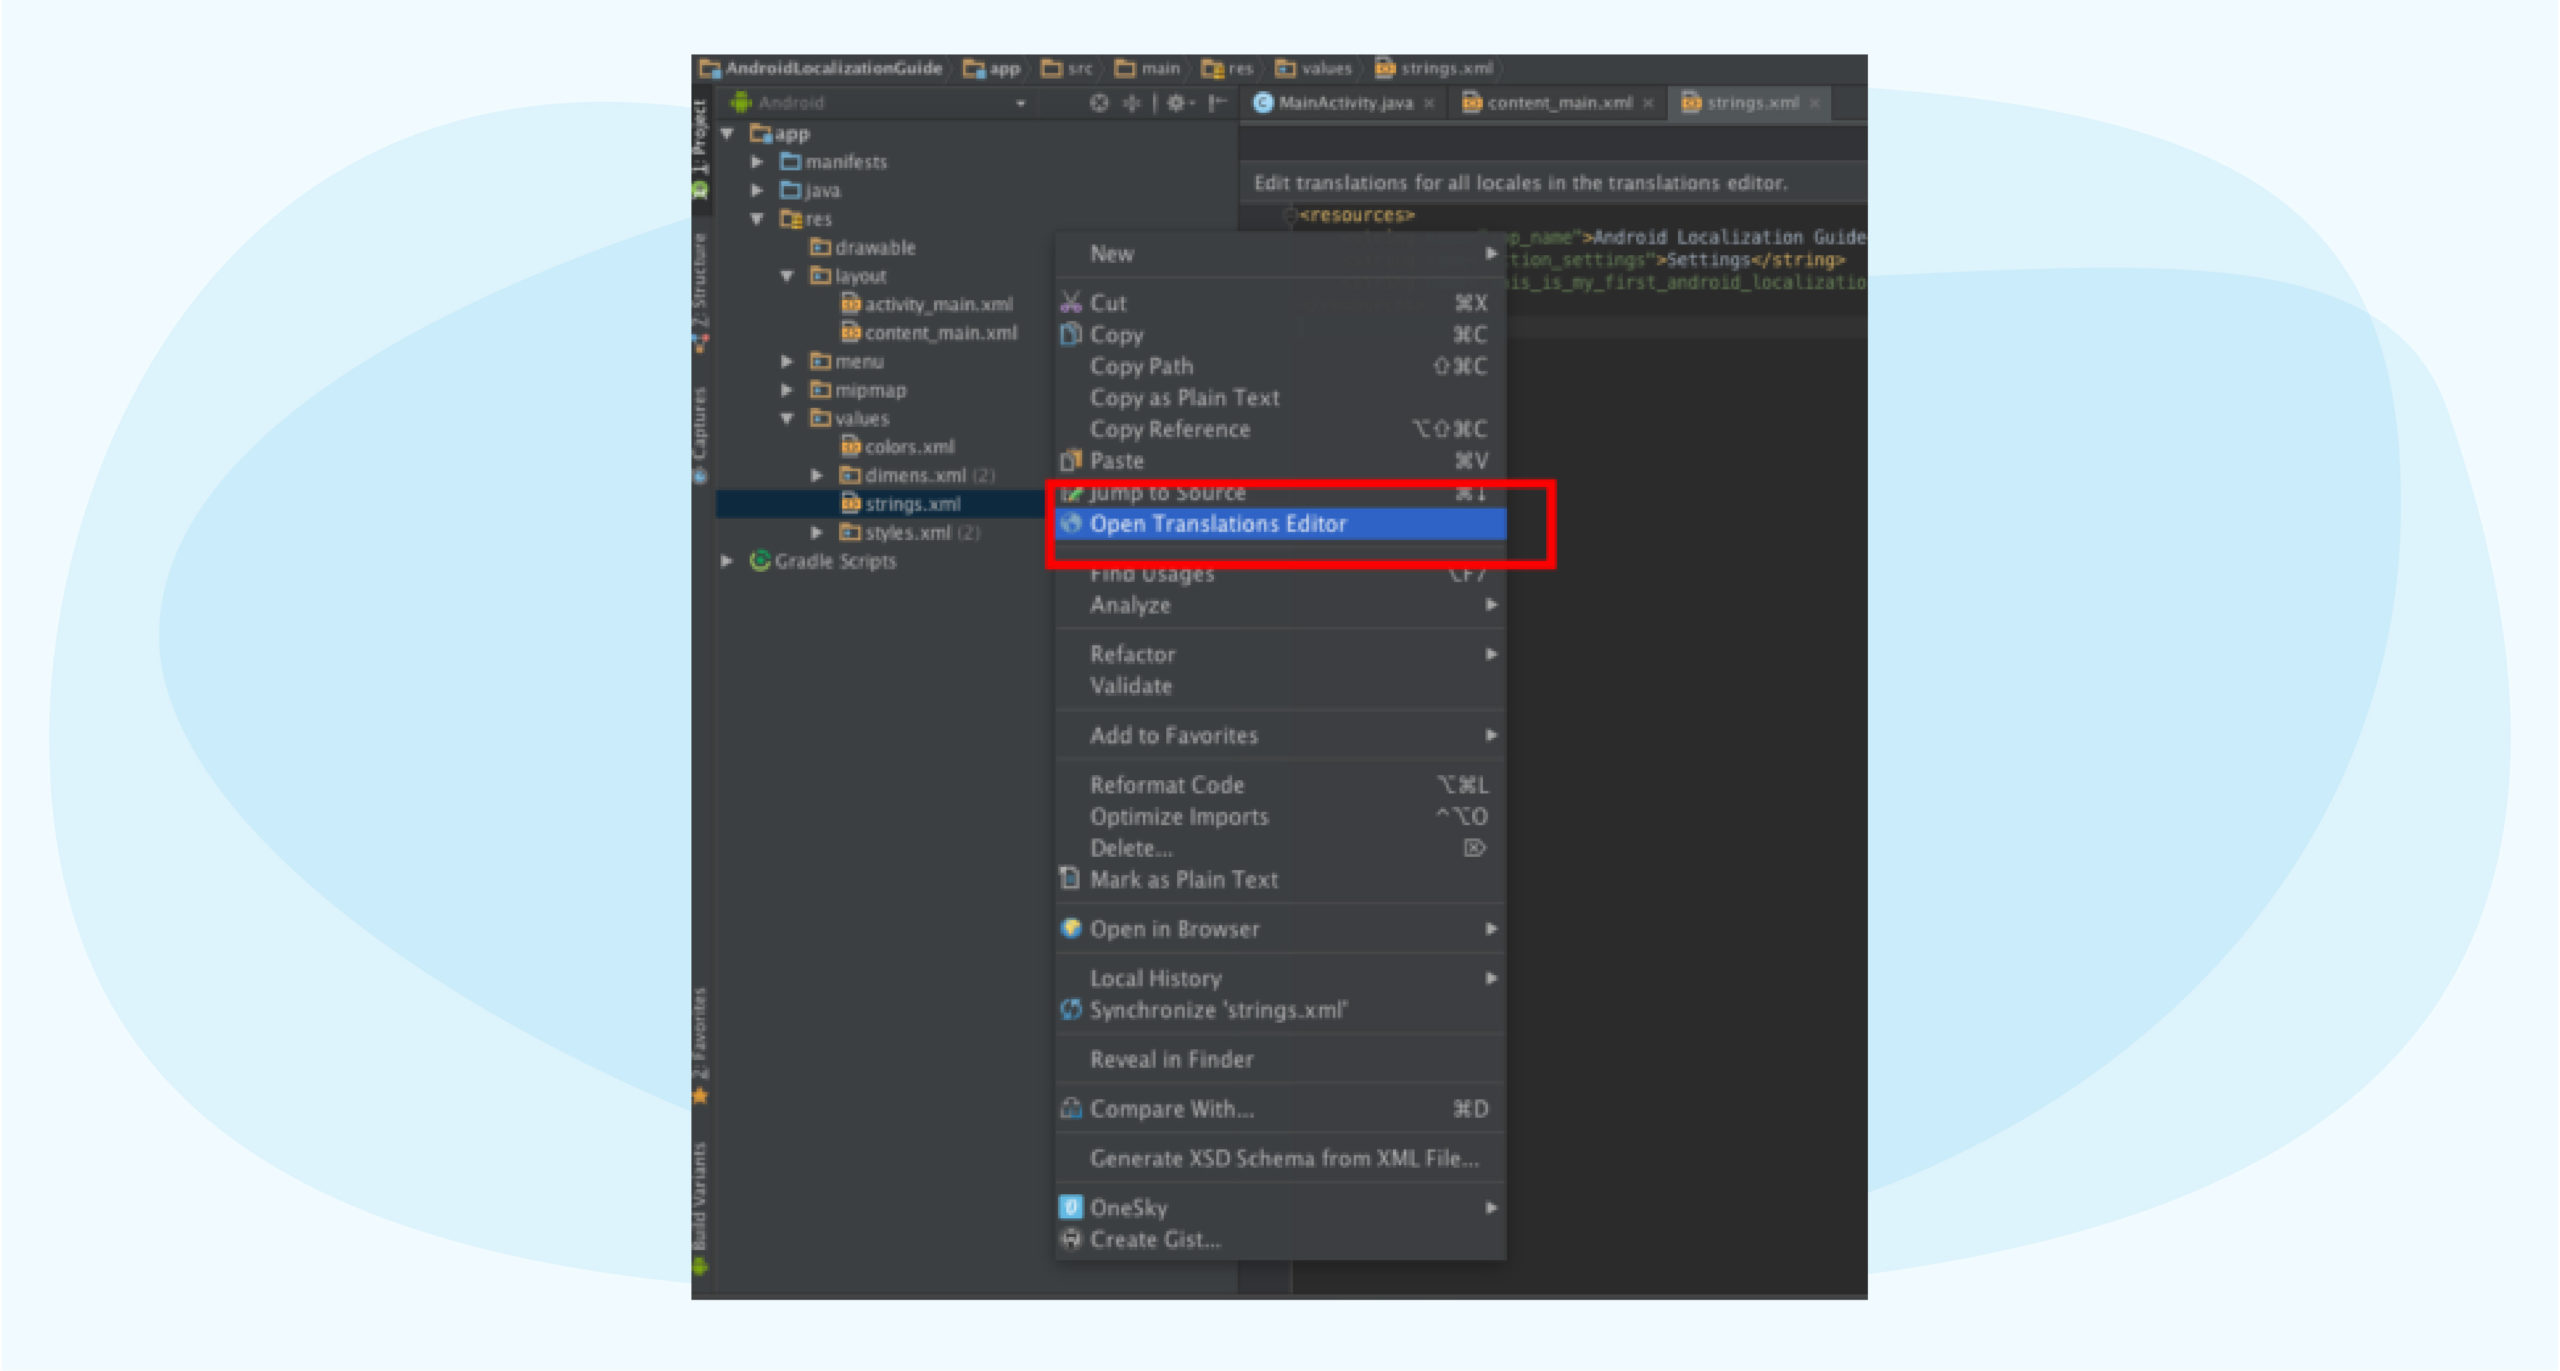
- On the Translations Editor tab, click on the upper left blue globe icon to add French (fr) and create a French (fr) column.

- Enter the translation for this_is_my_first_android_localization_project, “Ceci est mon premier projet de localisation Android!” into the French (fr) column.

- A new strings.xml for your French translations is automatically created in the directory /res/values-fr/strings.xml. You can open fr/strings.xml to see the French text.

3. Test the Localized App
Make sure the translated text shows up as you’d expect, here’s how:
- Import the following libraries into MainActivity.java: android.content.res.Configuration and java.util.Locale
- Add (or uncomment) the following code in the onCreate() function:
Locale locale = new Locale(“fr”);
Configuration config = getBaseContext().getResources().getConfiguration();
config.locale = locale;
getBaseContext().getResources().updateConfiguration(config, getBaseContext().getResources().getDisplayMetrics());
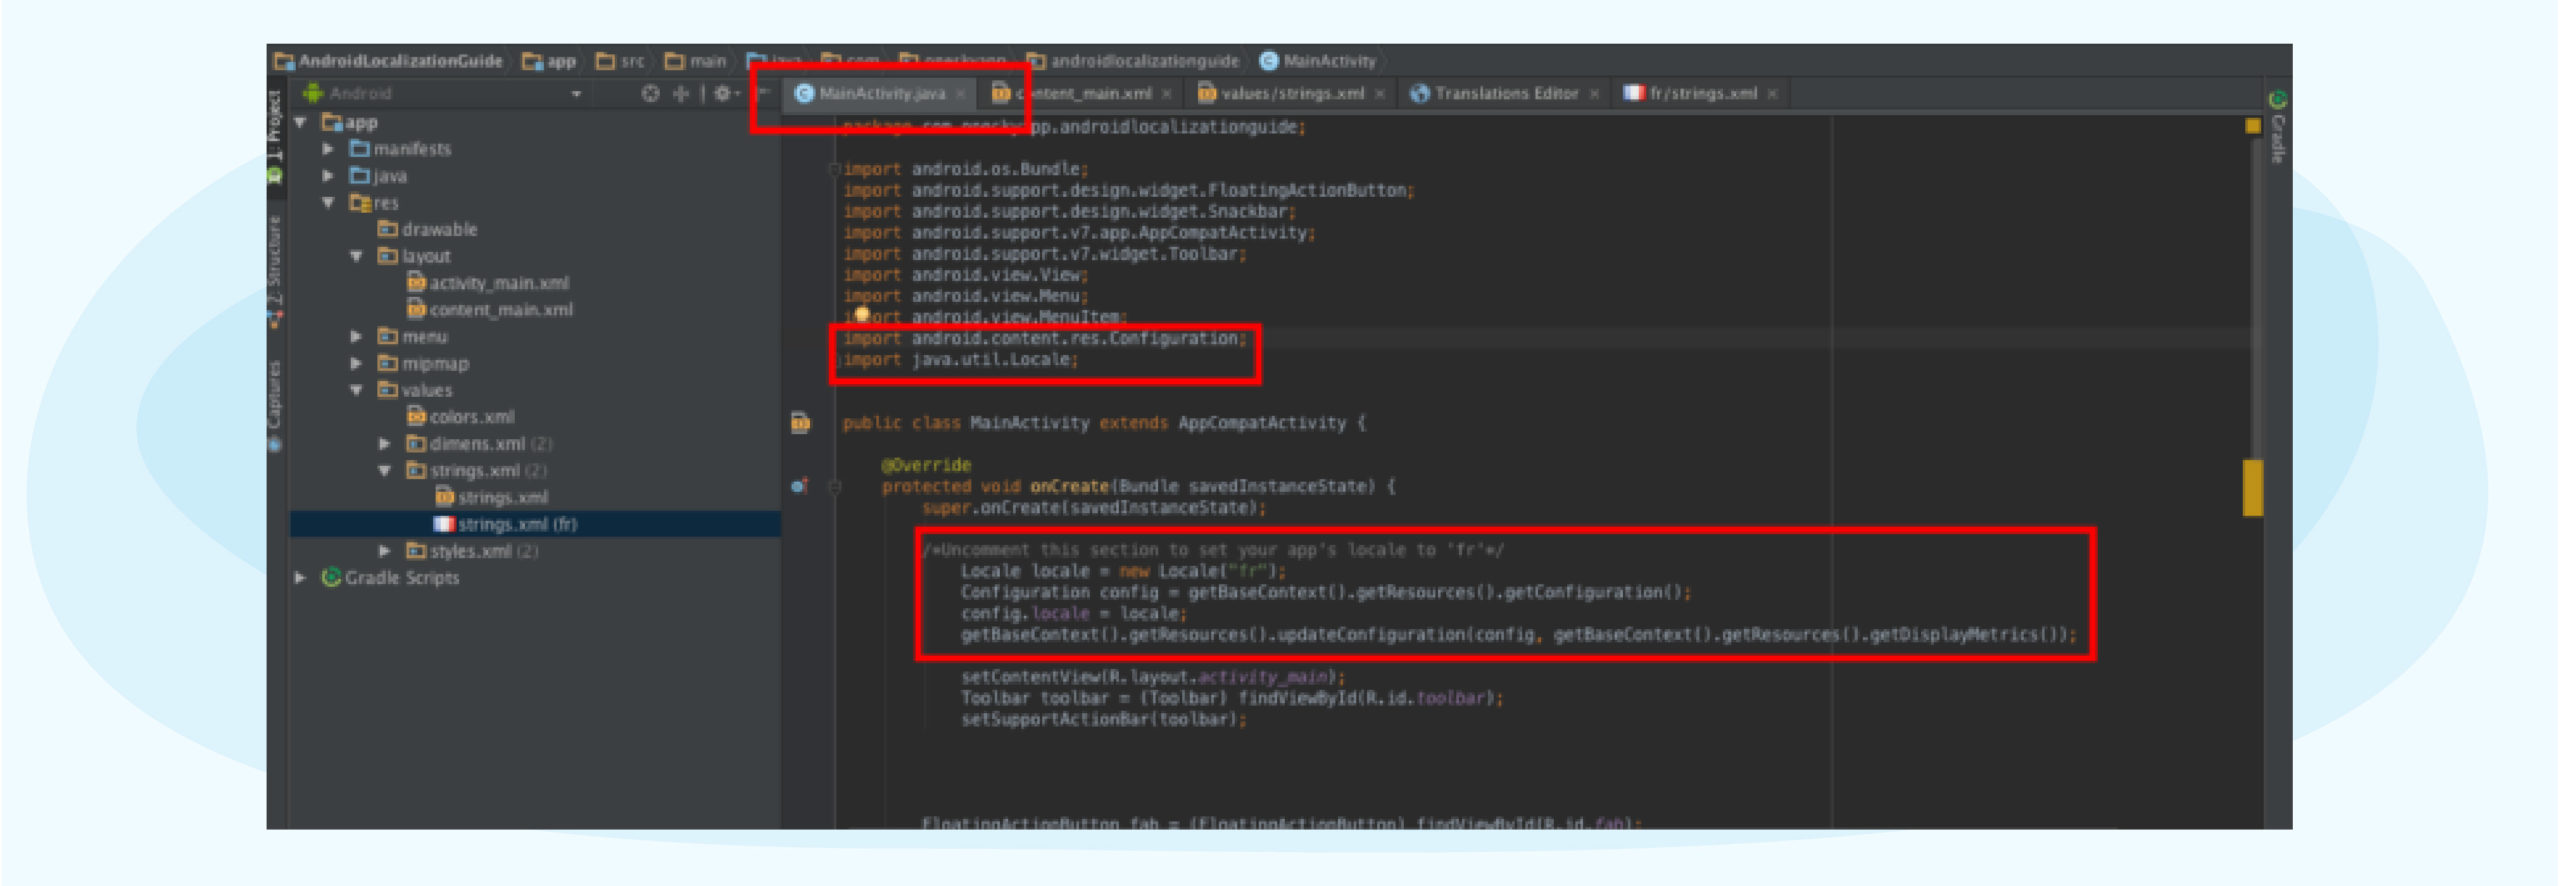
- Run the emulator to see your French translation!
Format Strings and Pluralize
There are three types of string resources:
- Strings:
<string name=”language”>language</string> - String array, which organizes a list of items:
<string-array name=”language_array”>
<item>English</item>
<item>French</item>
</string-array> - Quantity strings, which handle pluralization:
<plurals name=”languages”>
<item quantity=”one”>%d language</item>
<item quantity=”other”>%d languages</item>
</plurals>
Regardless of the string type, you may encounter some formatting challenges.
For example, you have a dynamic string that says OneSky translated 1 out of 3 languages.
You can follow the Android string formatting resource.
In values/strings.xml, you’ll have:
<!–%s{username} translated %3$d{num} out of %2$d{total} languages –>
<string name=”sentence_test”>%1$s translated %2$d out of %3$d languages.</string>
In MainActivity.java, you’ll have:
/*getString(R.string.sentence_test, “username”, num, total)*/
String sentence = getString(R.string.sentence_test, “OneSky”, 1, 3);
But you may run into positioning issues in some languages. For example, the string above will be translated into “OneSky 翻譯了 3 個語言中的 1 個。” in Chinese, which essentially flips the meaning of the original sentence. (Even if you can’t read Chinese, you’ll notice that 3 precedes 1).
To fix the issue, use positional specifiers to notate the order by inserting n$ into the format specifier, e.g., %1$s, %2$d, %3$d.
The format string for Traditional Chinese would look like this in values-zh-Hant/strings.xml:
<!–%s{username} 翻譯了 %3$d{total} 個語言中的 %2$d{num} 個。–>
<string name=”sentence_test”>%1$s 翻譯了 %3$d 個語言中的 %2$d 個。</string>
Another common issue is pluralization.
If we use the example above,but make it “OneSky translated 1 out of 1 language,” we have a grammatical mistake.
The good news is that Android Studio has nifty string arrays that can handle pluralization. Here’s how to enable pluralization support:
- In the default values/strings.xml, insert the following quantity string:
<plurals name=”languages”>
<item quantity=”one”>%d language</item>
<item quantity=”other”>%d languages</item>
</plurals> - Test the plural form with the following code:
int numLang = 1;
Resources res = getResources();
String numLanguages = res.getQuantityString(R.plurals.languages, numLang, numLang); - The first numLang parameter in res.getQuantityString() will return the correct string form, while the second numLang parameter replaces the %d placeholder if present. (Otherwise, you only need to call it once.)
- The string numLanguages now has the value 1 language.
Getting pluralization right can be tedious because each language has unique grammatical rules. The good news is that Android’s built-in support for quantity strings (plurals) will make it a breeze.
Android App Localization Best Practices
A successful localization project involves more than coding. Follow these best practices to ensure that you have a high-quality app for every locale.
⭐ Plan Your Android Localization Project
Decide which countries and languages to localize for. You may prioritize your efforts based on market size, sales potential, etc. Then, assemble a team that consists of a localization manager, developers, designers, translators, reviewers, local marketers, and legal advisers.
Next, map out your localization workflow, validate the timeline, and select a localization platform to manage translation, development, quality assurance (QA), and other tasks to ensure nothing falls through the cracks.
⭐ Select Your Locale
A locale combines a country and a language to represent a geographical, political, or cultural region. For example, the U.S. and UK are two separate locales. Even though users in both countries speak English, they use different formats to represent dates, times, and numbers. They also use different expressions and call the same things differently (e.g., truck vs. lorry.)

⭐ Don’t Hard Code Text or Resources
Avoid hardcoding text or resources so your app can adapt to different languages, regions, and cultures in a flexible, scalable, and efficient way. Place text and resources in the default strings.xml file, so you can easily modify the content for multiple locales without recompiling the source code.
Another way to make the localization process more cost-efficient is to avoid including text in images. Keep the text as strings whenever possible, so you don’t have to create a new graphic for every language.
⭐ Make strings.xml Translator-friendly
Translators who work on your content may only see the strings without much knowledge about your app or brand. Make their jobs easier by including information about the context of each string in the strings.xml file.
Providing context is particularly important for shorter text. For instance, “clear” in English can mean either delete or transparent, depending on how the word is used. Contextual information can help you manage text strings efficiently and increase translation accuracy.
- Give the strings a meaningful name. For example, <string name=”login_button”>LOG IN</string> for a login button.
- Add comment to the string:
<!– This is the login page’s button –>
<string name=”login_button”>LOG IN</string>
⭐ Mark Content That Doesn’t Require Translation
Some content, such as code, value placeholder, special symbols, or proper nouns, won’t require translation. Indicate these texts using an <xliff:g> tag in the strings.xml, so translators know not to change them.
You can also use the id attribute to explain the purpose of a placeholder text or an example attribute to show how you plan to display the string using the placeholder to provide more context.
- Encase your text with <xliff:g> tags:
<string name=”onesky_name”>
<xliff:g id=”company”>OneSky</xliff:g>is a localization company.
</string> - Add the translatable=”false” attribute:
<string name=”onesky_name” translatable=”false”>
OneSky is a localization company.
</string>
⭐ Account For Styling and Formatting
Localization must also address visual styling and overall UI. Here are a few tips:
- Indicate text length limit to preserve UI layout:
<!– This is the login page’s button, limit to 10 characters –>
<string name=”login_button”>LOG IN</string> - Spacing and other visual conventions. For example, E-mail: hello@oneskyapp.com requires a space after the colon. However, in Chinese, 電郵:hello@oneskyapp.com, the colon includes a natural space. Therefore, you should include extra spaces in the strings’ resource file for languages that need it.
- Android XML requires phrases that need a preserved trailing space to be encased in double-quotes: <string name=”email”>”E-mail: “</string>. But in Chinese, you don’t need the double quotes because no trailing space is required: <string name=”email”>電郵:</string>.
⭐ Organize Your Resources
Resources refer to static assets such as text strings, graphics, images, sounds, etc., used by an Android app. You may need to create multiple sets of resources, each for a specific device configuration (e.g., selected language, screen size, country code, etc.) Android will automatically load the resources most appropriate for a user’s device and locale.
To start, create specific directories within res/, one for each locale. Use the naming format “values-<ISO language code>” for text string resources and put locale-specific graphics and layout into the res/drawable-<qualifiers>/ and res/layout-<qualifiers>/ folders.
⭐ Define Default Resources
What if the resources are incomplete for a specific user’s locale? Then, Android will display the default version of app resources.
To define default resources, place them in the app’s res/ directory. The app’s default language should be one most likely used by your target audience. Then, put localized sets in appropriately named subdirectories within the res/ directory.
⭐ Ensure Resource Sets Are Complete
If a resource doesn’t exist in the default directory, the application won’t run, and users will see an error. To ensure a seamless user experience, verify that a default resource is defined for each reference in the Android app.
While Android will pull default resources if the localized version doesn’t exist, this would often lead to poor usability and a disjointed user experience. Double-check that all the resource sets are complete, and keep incomplete sets separate from the app until you have everything ready.
⭐ Keep Resource Files to a Minimum
Keeping all your resource sets current and in sync requires substantial time and effort when you expand into different markets. To streamline workflows and avoid errors, keep the number of resource files to a reasonable minimum without impacting the user experience.
For example, separating images from text means you only need to update one graphic for most locales. When localizing for regions with extensively overlapping variations, such as the U.S. and UK markets, you can set American English as the default and only localize a small amount of text containing different nouns or expressions.
⭐ Display Date, Time, Numbers, and Currencies Correctly
Like text strings, don’t hardcode these locale-specific elements into the app. Thankfully, Android has several built-in utilities to help you format them correctly across locales.
Use getDateTimeInstance in the DateFormat class to ensure that dates and times are displayed appropriately for each locale. String.format() or DecimalFormat does the same for numbers and currency, while PhoneNumberUtils ensures that phone numbers are displayed according to local conventions.
⭐ Review Translated Text
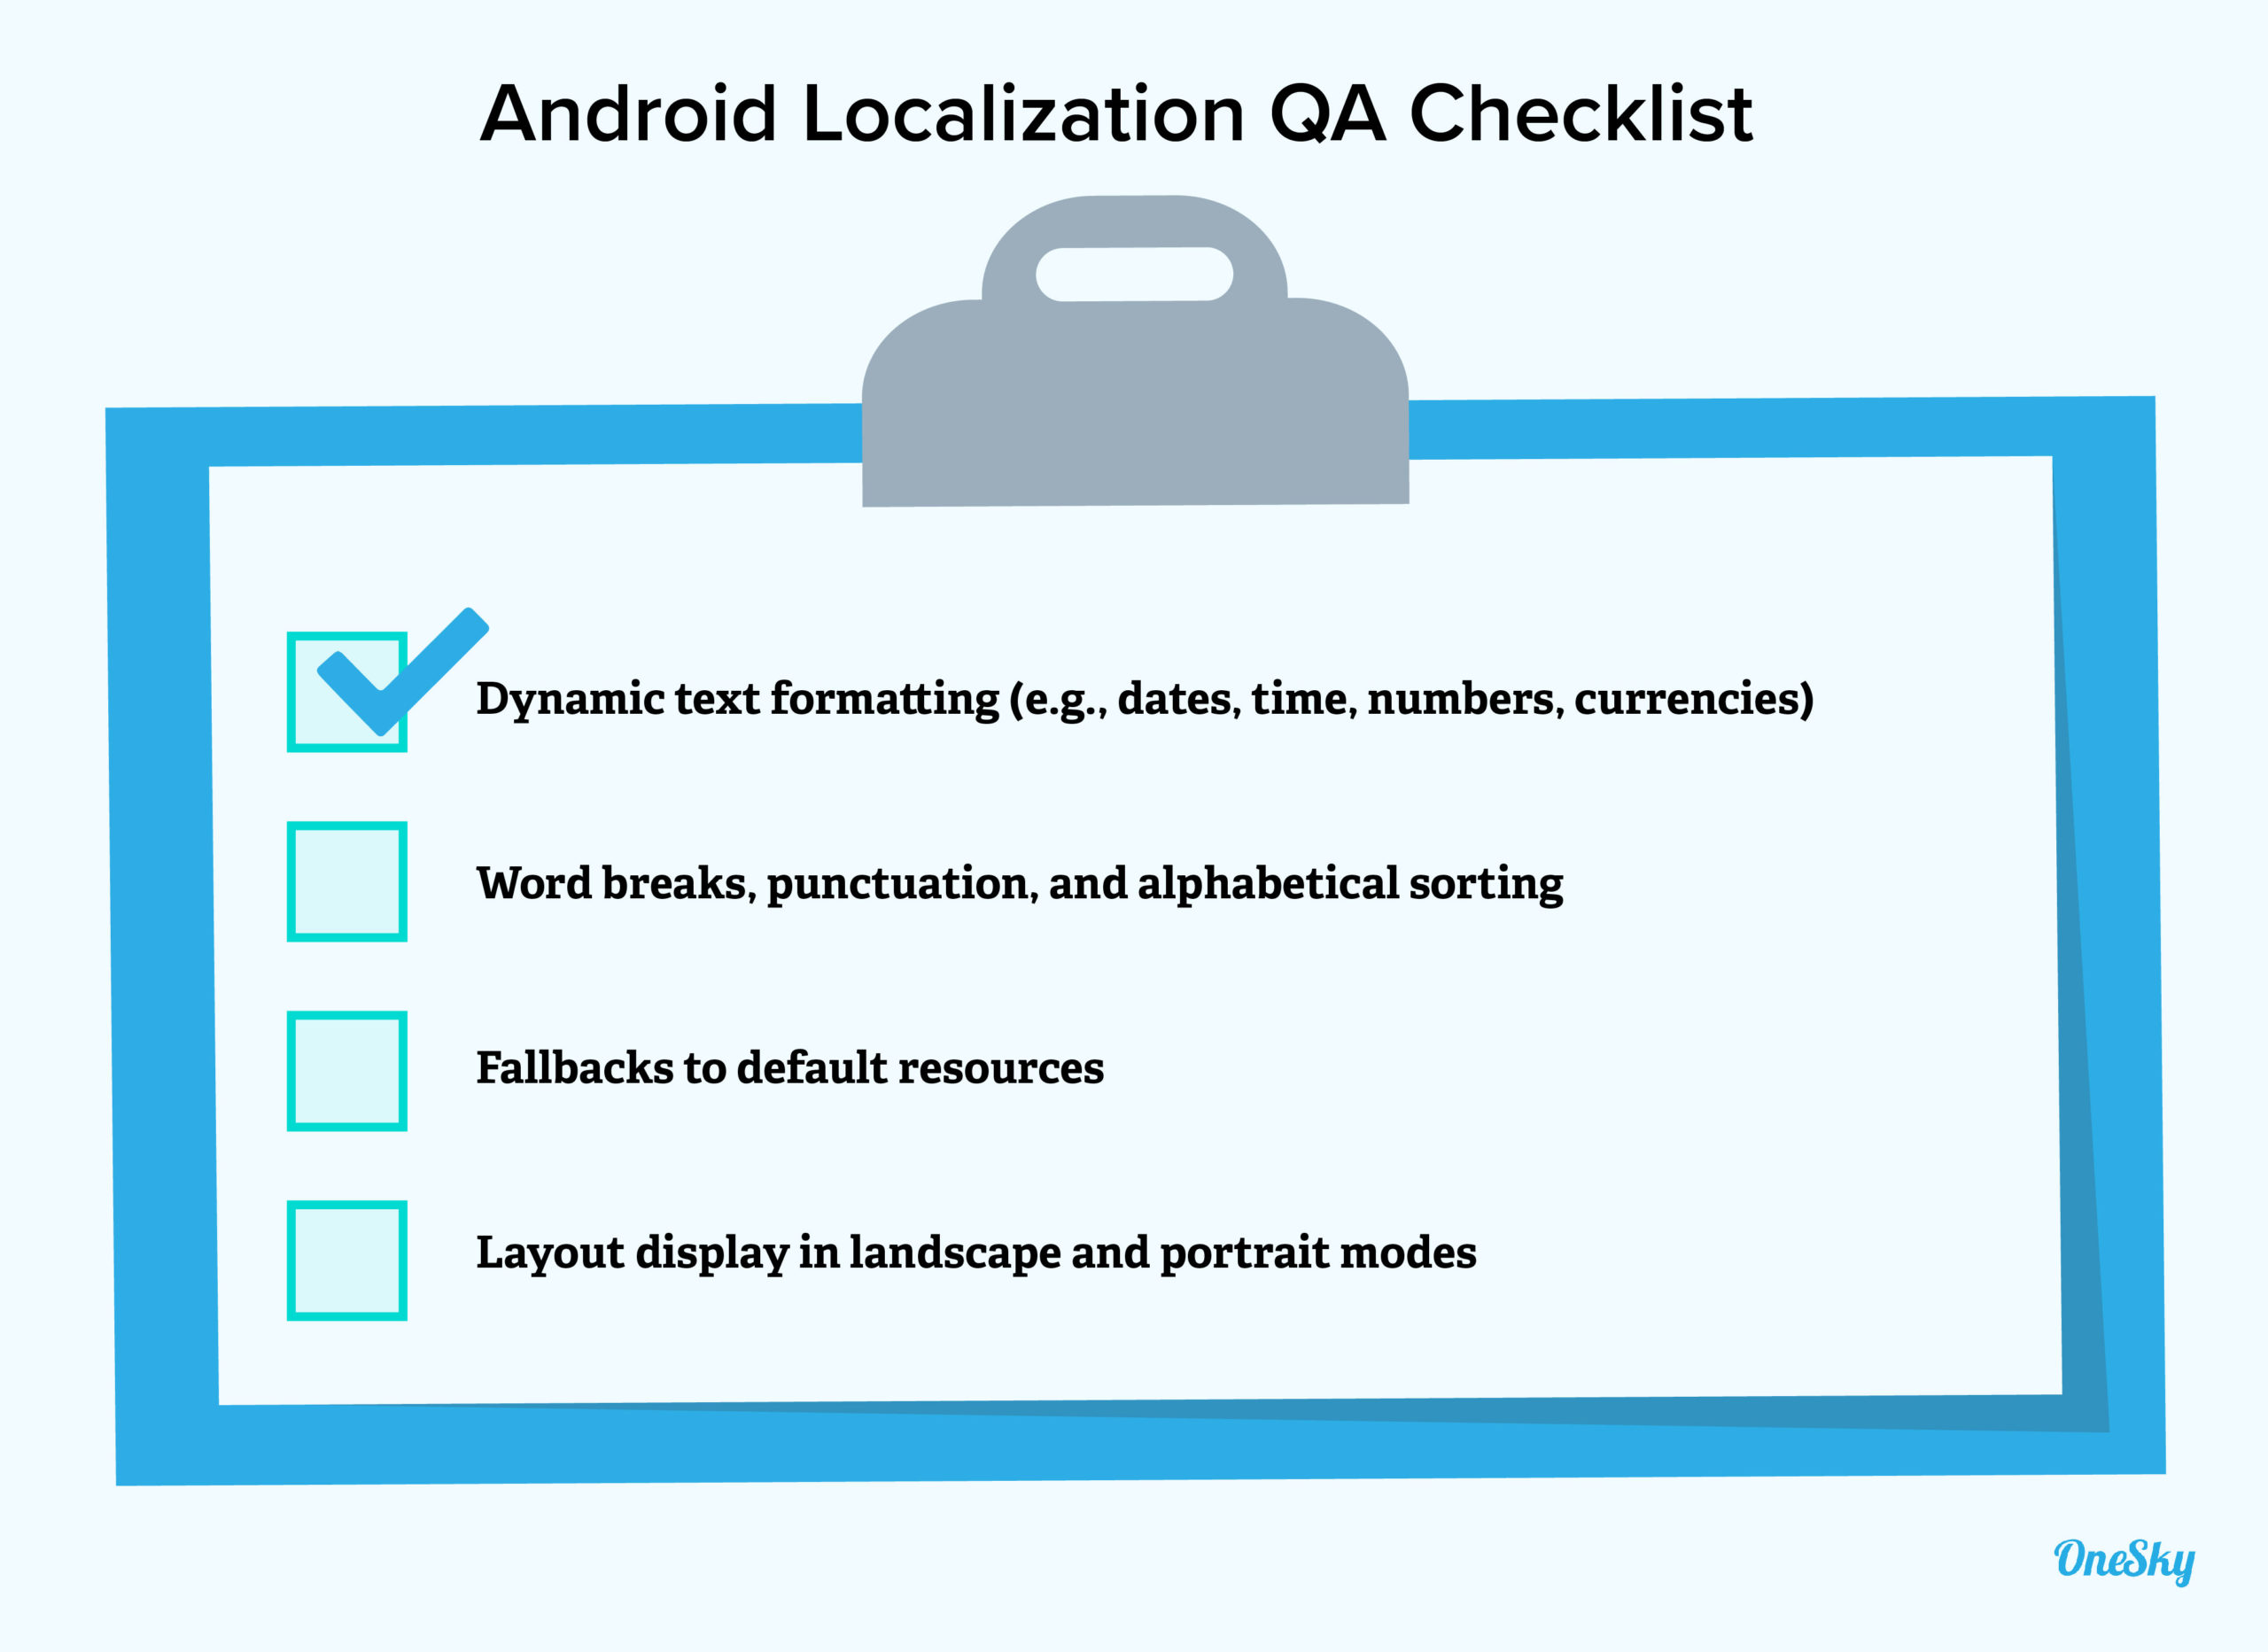
When you get the translated text from your translation service, move the files into the resource structure in your app. Use the appropriate language and locale qualifiers to ensure proper loading based on the selected region. Then, test the app for each locale and check that everything is displayed correctly.
⭐ Optimize Your Keywords
Translate your app description for Google Play Store and target the right keywords for each locale. Research and select search terms based on the market, e.g., consider the competitiveness of each keyword and your audience’s search behaviors.
Work with a local SEO expert to find the most effective keywords, which may differ from those in the default language version.
⭐ Upload to Google Play
After you have ticked all the boxes, it’s time to sign the app, make the final build, and upload it to Google Play.
Select the language for your localized app and upload the .apk file. Then, add translations for the store listing page, Google Ads campaign, and the localized versions of promotional graphics or videos for each language.
Managing All the Moving Parts of Android App Localization
Android localization may not be a stroll in the park, but the good news is that you don’t have to do it all on your own! Savvy global brands, developers, and product managers use robust localization platforms to help them translate, localize, and test their apps.
OneSky’s end-to-end localization solution allows you to work with nearly 40 file formats, order professional translations in 50+ languages, and communicate with your translators all in one place. Learn more and get started for free.

